Paver Calculator
Calculate Paver Quantity, Square Footage, and Project Costs for Patios & Driveways
1. Project Dimensions
2. Paver Brick Size
3. Material & Installation Costs
Planning a patio or walkway often starts with a vision, but it succeeds or fails based on the math. While the calculator above handles the heavy lifting of geometry, understanding the “why” behind the numbers will save you from ordering too little material or blowing your budget.
The “Overage” Rule: Why Exact Numbers Aren’t Enough
The calculator above gives you the exact number of bricks required to cover your square footage. However, in the real world, pavers break, cuts go wrong, and corners rarely line up perfectly.
You must add a buffer to your order, known as “overage.”
- Simple Rectangular Patios: Add 5% to the total count. This covers minor breakage during shipping and handling.
- Curved or Angled Designs: Add 10% to 15%. Every time you cut a paver to fit a curve, you lose a portion of that brick.
- Complex Patterns (Herringbone/Diagonal): These require significantly more cuts at the borders. Stick to a 15% buffer to be safe.
Pro Tip: Always keep 10–20 extra pavers stored in your garage after the project is done. If a stone stains or cracks three years from now, finding an exact color match from a new batch is nearly impossible.
Your Paver Layers
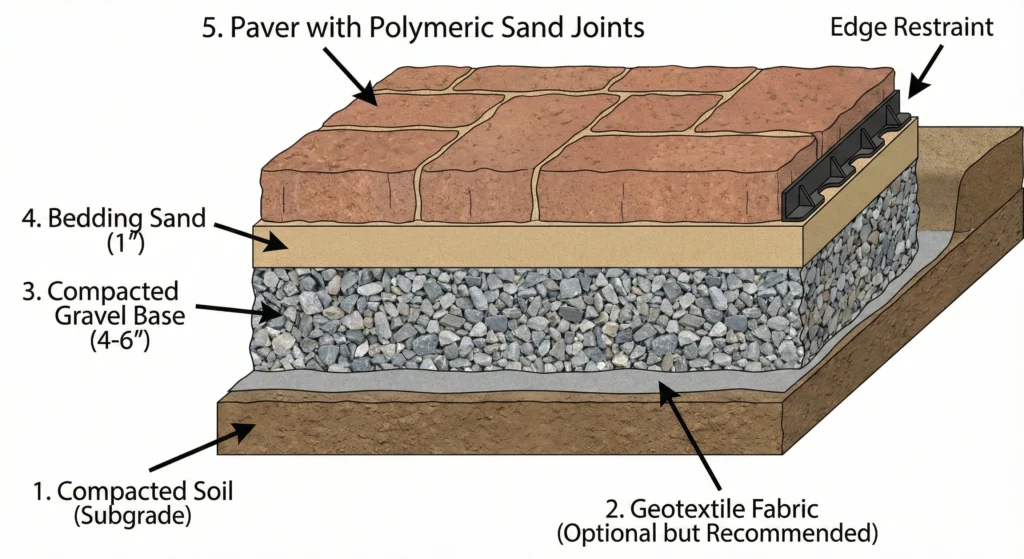
A common misconception is that pavers sit directly on the dirt. If you do that, your patio will sink and wobble within months. A proper installation is a system of layers.
- Subgrade (The Soil): This needs to be excavated and compacted.
- Base Material (CR-6 or 3/4″ Minus): This is crushed stone with stone dust. You generally need 4 inches for foot traffic (patios) and 6–8 inches for vehicular traffic (driveways).
- Bedding Sand: A 1-inch layer of coarse concrete sand that allows you to level the pavers perfectly.
- The Pavers: The visible layer you calculated above.
- Polymeric Sand: The special sand swept into the joints that hardens like grout to prevent weeds and ants.
Note: This calculator focuses on the paver count. Don’t forget to calculate your gravel and sand needs separately based on your project’s depth.
Choosing the Right Paver Shape and Size
The inputs in the calculator ask for Brick Length and Width because size dictates labor speed and durability.
- Large Format Pavers: These cover area quickly and provide a modern look. However, they are heavy to lift and require a perfectly flat base, as they are more prone to cracking if the ground settles unevenly.
- Standard Bricks (4″ x 8″): The classic choice. They are tedious to install individually but offer the highest load-bearing strength, making them ideal for driveways.
- Small/Cobblestones: Great for decorative borders or circular fans, but they require significantly more time to install due to the sheer number of pieces.
Cost Factors You Might Overlook
When using the “Cost” section of our tool, keep in mind that the price per paver is just the starting line. When budgeting, consider these variables:
- Material Composition: Concrete pavers are generally the most affordable ($3–$10/sq ft). Clay brick is mid-range ($6–$15/sq ft), while natural stone (Travertine, Bluestone, Granite) commands the highest price ($15–$30+/sq ft).
- Site Access: If your backyard is fenced in and you cannot fit a machine through the gate, labor costs will skyrocket because materials must be wheelbarrowed in by hand.
- Soil Conditions: Clay soil retains water and requires a deeper gravel base (more digging, more material cost) compared to sandy soil.
How to Measure Irregular Shapes
Most backyards aren’t perfect squares. If your project has curves or an L-shape:
- Divide and Conquer: Break your project area into smaller, standard rectangles or squares.
- Calculate Individually: Use the “Single Rectangle” mode for each section and note down the square footage.
- Sum It Up: Add the areas together to get your total square footage.
- Enter the Total: You can enter the total square footage directly into the calculator logic by adjusting your length/width to equal that area, or simply use the area result to check your manual math.
FAQs
Q1. How deep should I dig for a patio?
A: For a standard patio, you typically need to excavate about 7 to 9 inches. This accounts for 4 inches of gravel base, 1 inch of sand, and the thickness of the paver (usually 2 ⅜ inches).
Q2. Can I install pavers over concrete?
A: Yes, this is called an “overlay.” However, you must ensure the concrete is in good condition (no large cracks) and you must adhere the border pavers to the concrete to keep the inner pavers from shifting.
Q3. What is the difference between sq ft and linear ft?
A: Square footage (Area) is used for the pavers themselves. Linear footage (Perimeter) is used to calculate how much “Edge Restraint” you need to buy to hold the pavers in place around the outside.